
A microscope usually gives a clear picture when everything is in good condition. Then, one day, the image looks cloudy. A dark spot appears in the same place. Fine details are harder to see.
The first reaction is often to adjust the focus.
Sometimes that works. Sometimes it does not.
A dirty objective, dusty eyepiece, or a little leftover immersion oil can be enough to affect the view. The microscope itself may be perfectly fine.
That is why regular microscope maintenance cleaning and care matter. It is not about spending hours cleaning laboratory equipment. It is mostly about doing a few small things at the right time.
For students, teachers, laboratory staff, and anyone who works with a microscope, a simple routine can prevent a lot of unnecessary trouble.
Start With the Parts That Matter Most
Not every part of a microscope needs the same amount of attention.
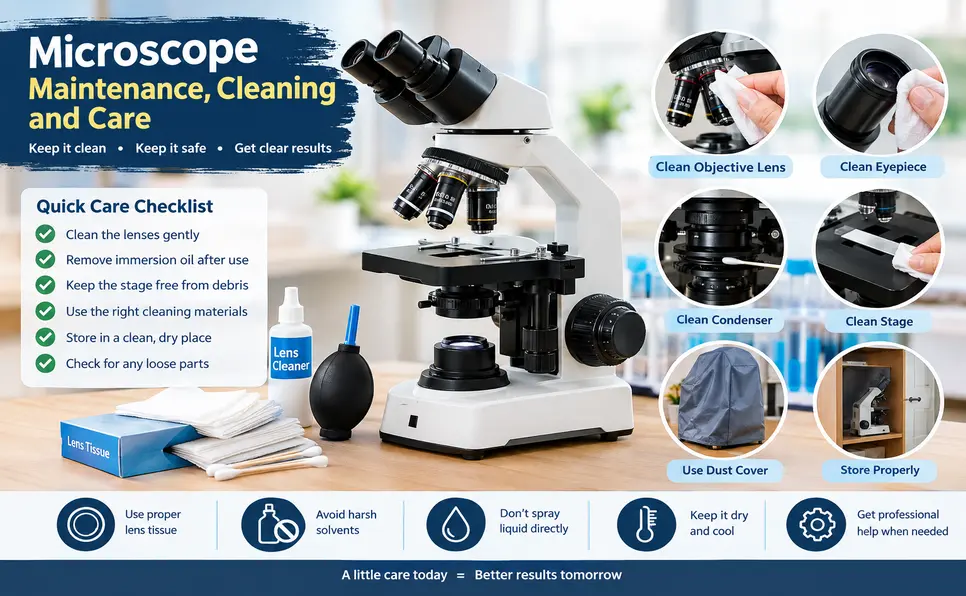
The objective lenses are usually the first place to check. They sit close to the specimen, so dust, fingerprints, sample residue, and immersion oil can easily reach them.
The eyepieces are another common source of dirt. They are handled regularly and can pick up fingerprints without anyone noticing.
Then there is the condenser, stage, specimen holder, and microscope body. These parts also need occasional cleaning, but the approach is different.
The main idea is simple: clean the part that needs cleaning instead of wiping everything just for the sake of it.
What Is Needed for Basic Cleaning?
A microscope does not need a cupboard full of cleaning products.
A few suitable items are enough:
- Lens tissue
- A soft, lint-free cloth
- An air blower
- A cleaning solution approved for microscope optics
- Suitable cotton swabs, if recommended by the manufacturer
- A dust cover
The quality of the cleaning material matters.
A paper towel may look harmless, but optical surfaces are not the same as a kitchen counter. Rough material can leave fibers or cause tiny scratches.
Cleaning chemicals also need some thought. A solvent that works well on one surface may damage another. Microscope manufacturers often give specific instructions for their lenses and coatings, so those instructions should be followed.
One basic rule is worth keeping in mind: cleaning liquid should not be sprayed directly onto microscope optics.
Cleaning an Objective Lens
Objective lenses are small, but they have a big effect on image quality.
Before cleaning one, have a close look at the front surface. If the only problem is loose dust, an air blower may be all that is needed.
That first step is useful because wiping dusty glass can move tiny particles across the surface.
If there is a fingerprint or residue, use proper lens tissue and an appropriate cleaning solution. Work gently. There is no need to scrub.
This is one area where more effort does not mean better cleaning.
After cleaning, check the image again. If the image has improved, the dirty objective was probably part of the problem.
If nothing changes, there is no reason to keep cleaning the same lens repeatedly. The problem may be somewhere else.
Eyepieces Need Attention Too
Eyepieces are easy to forget.
Since they are touched and adjusted frequently, fingerprints can build up around them. Dust can also settle on the optical surface.
The cleaning process is much the same. Remove loose dust first, then use suitable lens tissue if marks remain.
A soft touch is enough.
It is also worth checking both eyepieces on a binocular microscope. Sometimes one side is noticeably dirtier than the other.
A quick check like this can save time when trying to find the cause of an unclear image.
Immersion Oil Should Not Be Left Behind
Oil-immersion objectives deserve special attention.
Immersion oil is used with certain high-magnification objectives. It improves the way light passes between the specimen and the objective, allowing detailed images to be viewed.
The useful part is what happens during observation.
The less useful part is the oil that remains afterward.
If the objective is put away with oil still on it, dust can stick to the surface. The oil may also become harder to remove later.
So, after an oil-immersion session, cleaning should happen before the microscope is stored.
Remove the remaining oil gently with suitable lens tissue. If a cleaning solution is needed, use the one recommended for that optical system.
There is no benefit in reaching for a random solvent simply because it is available in the laboratory.
Cleaning the Stage and Microscope Body
A microscope can have clean lenses and still look neglected.
Dust collects around the stage. Small pieces of specimen material can get caught near the slide holder. Fingerprints appear on focus knobs and other frequently handled areas.
These surfaces can normally be wiped with a soft, lint-free cloth and a suitable cleaning product.
The stage is worth checking after a busy practical session. A tiny piece of material left around the holder may not seem important, but removing it keeps the working area tidy and helps prevent buildup.
Extra care is needed around electrical connections and moving mechanisms.
A cloth should be damp rather than wet, and liquid should never be allowed to run into the body of the microscope.
For shared laboratory equipment, frequently touched areas may also need suitable disinfection. The disinfectant should be compatible with the microscope’s materials.
What About the Condenser?
The condenser is not handled as much as an eyepiece, so it is easy to overlook.
It still matters.
The condenser helps direct light toward the specimen. Dirt on its optical surface can affect illumination and image quality.
There is no need to clean it every time the microscope is used. A quick inspection from time to time is enough.
If dust is visible, remove it carefully. For deeper cleaning, the manufacturer’s instructions should be followed.
Taking the condenser apart just to get at internal surfaces is not a good routine. Internal optical components can require proper alignment after servicing.
How Often Should a Microscope Be Cleaned?
There is no magic number.
A microscope used throughout the day in a laboratory will naturally need more attention than one used for an hour every few weeks.
A practical schedule can look like this.
After Each Use
Take a quick look at the objectives and eyepieces.
If immersion oil was used, clean it before putting the microscope away.
Check the stage for bits of specimen material. Switch off the illumination and leave the microscope in a clean condition.
That is often enough for everyday use.
Once a Week
A more careful check can be done weekly.
Look at the objectives, eyepieces, condenser, stage, specimen holder, and external surfaces.
This is also a good time to check cables and connections for obvious damage.
Once a Month
A monthly inspection can go beyond cleaning.
Pay attention to changes in focusing, unusual movement, illumination problems, loose parts, or a sudden drop in image quality.
In a laboratory where several people use the same instrument, keeping a simple maintenance record can be useful. A date and short note are usually enough.
Finding the Source of a Dirty Image
This part can save a surprising amount of time.
Suppose a small dark mark appears in the image. It is tempting to clean every lens immediately.
That is not necessary.
Start with the specimen. Check the slide and coverslip. Then check the focus and illumination.
If the mark remains, inspect the eyepiece and objective.
Moving or rotating different components can sometimes help locate the source. If a mark moves with an objective, that objective may need attention.
This approach is much better than randomly cleaning every part of the microscope.
Mistakes That Can Damage Microscope Optics
Most microscope cleaning mistakes are easy to avoid.
Using Ordinary Tissue
Facial tissues and paper towels are not designed for delicate optical surfaces.
They can leave lint and may be too rough.
Proper lens tissue is a safer option.
Rubbing Too Hard
A lens is not a dirty window.
There is no need to apply force. Gentle cleaning is normally enough.
Choosing a Solvent Without Checking
This is a common mistake in laboratories.
Acetone, alcohol, xylene, and other solvents have different effects on different materials. A product that is safe for one component may be unsuitable for another.
The microscope manual should be checked before using a solvent.
Spraying Cleaner Onto the Lens
This can allow liquid to spread into unwanted areas.
Apply the appropriate amount to the cleaning material instead.
Taking Parts Apart Without a Reason
A microscope may look simple from the outside, but some internal optical parts are carefully aligned.
Removing them without the right tools or knowledge can create a bigger problem.
Routine microscope maintenance cleaning and care should stay within routine maintenance. Complicated internal work is better handled by a trained technician.
Storage Is Part of Microscope Care
A microscope can be perfectly clean and still develop problems because of poor storage.
Keep it somewhere clean and dry. A dust cover is useful when the microscope is not being used.
It is better to let the instrument cool before covering it, especially after long use.
Humidity deserves attention as well. Damp environments can be harmful to optical equipment over time.
The microscope should also be kept away from strong chemical fumes and excessive heat.
When moving the instrument, use the proper carrying points. Do not lift it by an eyepiece, focus knob, or another part that is not designed to support its weight.
A little care during storage can make the next laboratory session much easier.
When Cleaning Is Not Enough
Sometimes the microscope needs more than routine cleaning.
Professional service may be appropriate when there is:
- Internal contamination
- Persistent focus drift
- Damaged optics
- Calibration problems
- Internal moisture
- Motorized stage issues
- Unusual mechanical movement
- A major unexplained change in image quality
Trying to fix internal optical problems without the correct tools can make things worse.
There is nothing wrong with calling a technician when a problem is beyond normal cleaning.
In fact, knowing when not to take a microscope apart is an important part of proper care.
A Simple Routine for Students and Beginners
For someone new to microscope care, a long maintenance checklist can feel unnecessary.
A short routine is easier.
Before starting, check the objectives, eyepieces, and stage.
During the work, avoid touching the glass surfaces with fingers. If immersion oil is being used, keep it where it belongs.
After the session, remove the slide, clean any remaining oil, check the lenses, and switch off the microscope.
Before storage, make sure the instrument is clean and dry. Put the dust cover on after the microscope has cooled.
That is it.
Good care is usually about consistency rather than complicated procedures.
Related Technology and Learning Guides
Microscope work is closely connected with education, laboratory learning, and technology. TechInGot has several beginner-friendly resources that may be useful for readers exploring related topics.
For readers learning about website visibility, the guide on SEO for beginners explains basic search concepts in simple language.
Readers interested in online safety can also check the cybersecurity basics guide.
For education-related technology, How Does Technology Transform Education? looks at the changing role of digital tools in learning.
Artificial intelligence is another growing area of technology. TechInGot covers the subject in its guide on AI and everyday life.
There is also a practical guide to generative AI and chatbots.
Teachers and students who use online classroom tools may find the Google Classroom guide useful as well.
Frequently Asked Questions
How often should a microscope be cleaned?
A quick check after use is a good habit. More detailed cleaning depends on how often the microscope is used and how much dirt it collects. An oil-immersion objective should be cleaned after use.
What is the safest way to clean a microscope lens?
Remove loose dust first. If the lens still has marks, use suitable lens tissue and a cleaning solution recommended for that microscope.
Can alcohol be used to clean microscope lenses?
That depends on the lens and its coating. Some microscopes allow specific alcohol-based products, while others require different solutions. The manufacturer’s instructions should be checked first.
Why does a microscope show a blurry image?
A dirty objective or eyepiece can cause it, but the slide, coverslip, focus, illumination, and other optical components can also be responsible. Checking each possibility one at a time makes troubleshooting easier.
What is the best way to store a microscope?
A clean, dry location is best. Use a suitable dust cover and keep the microscope away from excessive moisture, heat, and chemical fumes.
Final Takeaway
Microscope maintenance cleaning and care do not have to become a complicated task.
The useful habits are quite ordinary: remove dust, clean lenses gently, wipe away immersion oil after use, keep the stage clean, and store the microscope in a suitable place.
There is also no need to clean every component every day. A quick inspection often tells what actually needs attention.
The main goal is simple: keep the optical surfaces clean, protect the mechanical parts, and deal with small problems before they turn into bigger ones.
A few careful minutes after a microscope session can go a long way toward keeping the instrument ready for the next one.